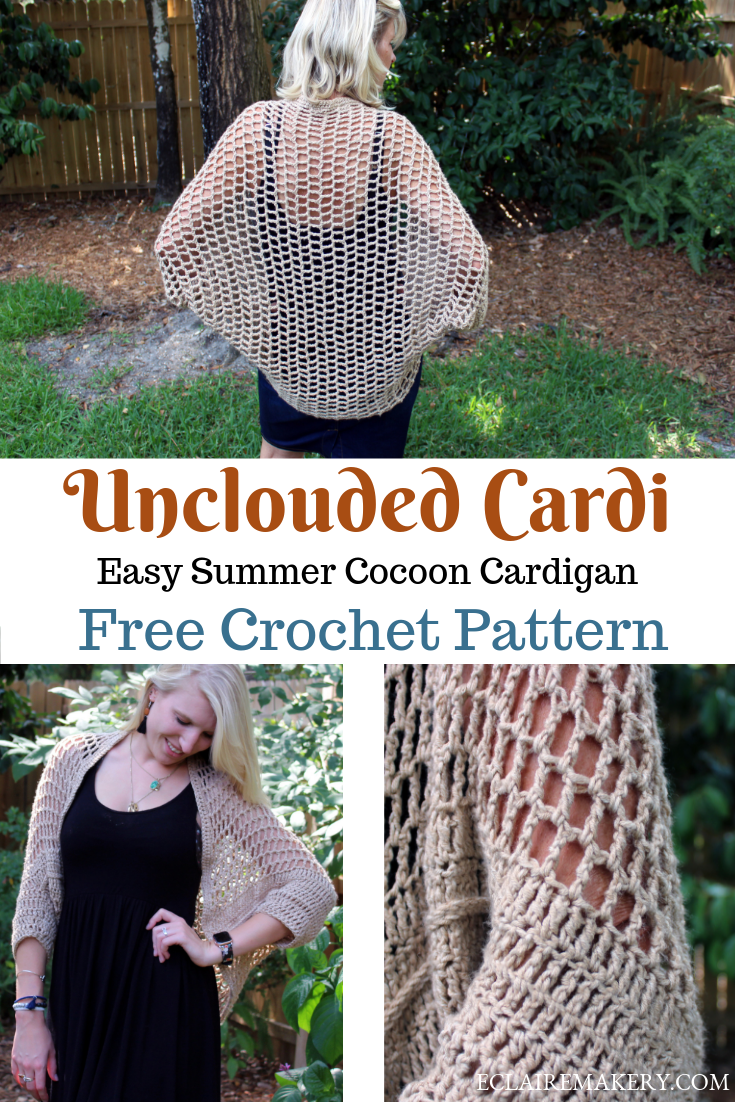
No matter what time of year it is, I am all about wearing oversized cardigans! Crochet cardigans and sweaters of any kind make me so happy, and it’s even better when I can wear them all year round. This week the E’Claire Makery guest blogger is my friend Abby from Skeins and Stitches Co, who has designed the gorgeous Unclouded Cardi that is a perfect free cocoon shrug pattern for summer! The crochet mesh created in the pattern helps give this cocoon cardigan a beautiful drape with an open and airy design. It’s definitely a crochet cardigan I would want to wear all summer long. So I am happy to introduce you to my friend Abby, and get to her lovely crochet pattern!
Love this pattern? Save it to your favorite Pinterest Board!

[the_ad id=”3309″]
About Me
I first learned to crochet around 12 years ago with my mom at a class at the public library in our neighborhood. Unfortunately, being a kid, I didn’t have the attention span to stick with a time-consuming and detailed hobby like crocheting. Plus, in my opinion, it didn’t help that the starter project was a single crochet scarf (made in short horizontal rows) that feels like it takes forever when you’re a kid. After finishing that scarf, I tucked all of my crochet supplies into the back of a closet and promptly forgot about the hobby until I was in college (about 5 years ago). I was dealing with a lot of stress at the time and mentioned needing something to do to relax at night and wind down my brain. My mom suggested I try crocheting again and I quickly fell in love with the art. It began as just a relaxing way to keep my hands occupied and get out restless energy while listening to recorded lectures and books for class, but quickly turned into a passion for making unique gifts and decorations. From there, that love blossomed into a love of sharing the techniques and I began teaching my friends and family the basics of crochet. I began to teach workshops in various neighborhoods and groups about six months ago and decided then and there to start the journey to become a Certified Instructor in Crochet with the Craft Yarn Council program. I make a large variety of items, depending on the season, and honestly, what I’m feeling inspired about at the time. I am always cold, so I love to make cozy things, but living in a warm climate allows me to make a lot of fun wearables and accessories for summer as well. I think the basically infinite amount of possibilities of what can be made with crocheting is part of the appeal of the craft for me.
Pattern Overview
Made from a rectangle, this cocoon cardigan is a great project for beginner and expert crocheters alike. It is simple construction, with a focus on customization and details that create a comfy, breathable, and gorgeous finished garment with just a few stitches. I call it the “Unclouded Cocoon Cardi” because it’s light and airy enough for those cloudless summer days and nights, and just feels like the perfect summer layer.
If you love this pattern, you’ll also love:


Supplies Needed
- 6.5 mm crochet hook (or size needed to achieve a loose and drapey finished “fabric”)
- Approx. 220 grams / 550 yards of worsted weight yarn (I used Lion Brand Jeans Colors – but you could use any worsted weight yarn, just make sure it has good drape to it – the fibers being too stiff will make your finished cardi stiffer and can change the way it looks)
- Tapestry needle (for weaving in ends)
Stitches (*US Terms*)
- Tr = Treble crochet
- Tr2tog = Treble crochet 2 together
- Dc = Double crochet (tutorial)
- Hdc = Half double crochet – optional, used in edging (tutorial)
- Sc = Single crochet – optional, used in edging (tutorial)
- Sl st = Slip stitch
- Ch = Chain stitch (tutorial)
- Sts = Stitches
- *…* = Repeat stitches/steps in between * * as noted
Gauge/Dimensions
- Gauge: 14 stitches (treble crochets) x 5 rows (treble crochets) = 4 inches
- The most important note on gauge for this pattern is that “loose = good”…you want your stitches to be loose as that creates the airy feel and breathability of the finished product.
- Finished dimensions of main rectangle (blocked/worn/relaxed): approx 32in (rows height/foundation chain to last row) x 28in (row length)
Construction/customization notes
- Pattern is made using U.S. terminology.
- This pattern is completed in “phases” of construction. The row or round numbers will reflect the rows/rounds to be completed in that section or phase, they will not be the full number. The garment is constructed in the following order: phase 1 – main body rectangle, phase 2 – seaming and sleeves, phase 3 – edging/pseudo-collar.
- In the pictures, both models are wearing the cardigan as written below (model 1 in the dress is 5’8” size M; model 2 in tank top/skirt is 5’7” size S/M). However, because of the simplicity of construction in this pattern, you can customize it to your exact figure and desired fit.
- You can easily size it up or down – though the pattern written should work for a few sizes, given the amount of stretch and the loose fit. It can be sized by adding more chains to the foundation row (adding length and drape), by adding a few extra rows to the main body (adding width across the back and towards the center), changing the number of stitches you seam together to create the sleeves, changing the number of rounds or decreases in the sleeves, or even adding additional rows to the collar/edging portion. You can also use these adjustments to customize the look of the finished cardi, for example, tightening the sleeves with a longer initial seam or adding additional decreases or rounds. Obviously the yarn quantities suggested below are for the pattern as written, so make sure you plan for any anticipated modifications before purchasing the yarn.
[the_ad id=”3330″]

Pattern Instructions
Phase 1 (Main Body Rectangle):
Foundation Chain: Ch 99 (if you’d like your cardigan to be longer, add additional chains here)
Row 1: Turn, work 1 tr into the 4th chain from the hook, then work 1 tr into each of the remaining stitches (to get the best finished edge, I personally work into the “bump” on the back of the chain stitches, but you use whatever method you prefer). Turn. (96 stitches)
Row 2: Ch 3, 1 tr into each stitch across. Turn. (96 stitches)
Row 3: Ch 3, skip tr at base of chain, 1 tr in next stitch, *ch 1 – skip 1, tr in next stitch*, repeat *…* to end of row, with final tr in top of turning chain. Turn. (48 tr/ch 1 groups/spaces)
Row 4: Ch 3, *tr in ch 1 space, ch 1, tr in next ch 1 space*, repeat *…* to end of row, with final tr into top of turning chain. Turn. (48 tr/ch 1 groups/spaces)
Rows 5 – 34: Repeat row 4 instructions. (Ch 3, tr in ch 1 space, ch 1, repeat. Turn at end of row). If you’d like to add extra width to your cardigan, just add additional rows here.
Row 35: Ch 3, tr into each stitch and ch 1 space across. Turn. (96 stitches)
Row 36: Ch 3, tr into each stitch across. Break yarn, and tie off. (96 stitches).
Phase 2 (seaming and sleeves):
Seaming (a.k.a. making it actually work as a garment) – this section is what creates the “armholes” and cocoon shape.
Seaming
Lay the finished rectangle out flat. Folding this correctly is the most important step of the entire construction, if it is folded the wrong way, the length and width will be reversed. Lay the rectangle in front of you (on the floor or a large table), so that the “solid” rows (tr in every stitch) are on the left and right sides of the rectangle. This makes the number of stitches the length of the garment, and the number of rows the width. Carefully fold this in half by bringing the top corners of the rectangle to the bottom corners, (hamburger-style if anyone else was taught this method in kindergarten). The fold should produce a long, skinny, rectangle with the solid tr rows on the left and right sides.
Once you have it folded properly, seam up each “side” where the solid rows meet. For the pattern written, sl st 29 stitches together, from the edge towards the fold, to create the arm holes. You should have 38 stitches remaining un-seamed at the fold.
If you’ve made adjustments here, or would like a tighter fitting sleeve, feel free to seam it into a smaller or larger opening based on your personal preference.
After you complete the seam, you can leave it as the single row of slip stitches, or do an additional row of surface slip stitching along the initial slip stitch seam to create a more finished look and interesting texture.
[the_ad id=”3309″]
Sleeves
the sleeves start at the join/slip stitch of the seam, and then continue in the round. The turning chain in the sleeves does not count as a stitch.
Round 1: Ch 3, tr into each of the 38 sts around, join with sl st to first stitch. (38 stitches)
Round 2: Ch 3, tr2tog, tr into remaining 36 sts, join with sl st to first stitch. (37 stitches)
Round 3: Ch 3, tr2tog, tr in next 2 sts, tr2tog, tr in next 10 sts, tr2tog, tr in next 10 sts, tr2tog, tr in next 2 sts, tr2tog, tr in last stitch, join with sl st to first stitch. (32 stitches)
Round 4: Ch 3, tr2tog, tr in next 13 sts, tr2tog, tr in next 14 sts, join with sl st to first stitch. (30 stitches)
Round 5: Ch 2, dc in each stitch around, join with sl st to first stitch. (30 stitches)
Repeat with other side to create the other sleeve. Weave in ends, and you’ve completed 95% of this cardigan.
If you would like, this is where you can repeat round 4 to continue tapering and lengthening the sleeve. You can also just repeat the round with 30 stitches, or whatever is a comfortable width for your sleeve. It is totally customizable. The instructions above are for the fit I wanted and the pictured cardi.
Phase 3: Edging/Collar
This section is totally optional. I decided to add it because I like the extra shape it gives to the cardi and the way it finishes the look, but if you would rather skip it, feel free! You can also add additional rows or use taller stitches than I did below if you want it to be more dramatic or more collar/lapel-like. You can also start it lower/go around more of the cardigan or less.
Starting with the cardigan laid in front of you, join the yarn with a sl st to the base of the 5th row from the seam.
Row 1: Sl st into the first stitch opening. Then single crochet around and down to the base of the 5th row down from the seam on the other side (matching it to the same spot that you started the yarn on the initial side). I did 160 and spaced them evenly, roughly 3-4 single crochets per post/turning chain around the edge. Slip stitch the last stitch to the base of the 5th row from the seam to match the other side. Turn. You could do more or fewer to create a more wavy look or a tighter look.
Row 2: Ch 1, working back up the row of single crochets, sc in the next 15, hdc in the next 25, dc 80, hdc 25, sc 15, sl st to initial join spot. Tie off. Weave in ends.
If you did additional customization of length or width, this number will be different. But plan to make sure the single crochets of row 1 are evenly spaced about 3 – 4 per post and you should be able to work out a similar look. You can also add additional rows of the sc, hdc, and dc stitches to create a thicker collar.
[the_ad id=”3330″]

I would love to see the finished product (with or without adjustments and customizations) so post using #uncloudedcardi and tag me (@skeinsandstitchesco) when you finish! If you enjoy this pattern or have any comments or questions, please feel free to reach out via email, facebook, or instagram, and I will happily help you however I can! Take me in your finished makes @skeinsandstitchesco and #uncloudedcardi.
You can find me on facebook and Instagram @skeinsandstitchesco, email me at abby@skeinsandstitchesco.com, and find more of my patterns, reviews, and other posts at www.skeinsandstitchesco.com
Happy Stitching,
Abby
Pin It For Later!